My astronomy equipment list varies so fast it seems almost daily. This list was accurate when it was made and I am quite sure it will outdated when you read it. It was probably outdated five minutes after I clicked the post button 🙂
Astronomy, either visual or astrophotography, requires a certain amount of equipment. In theory you could start this hobby with a $20 discount store special but I would not count on an enjoyable experience. Those scopes will frustrate you with blurry images of even the moon. That does not mean you have to spend a fortune on you astronomy equipment.
Unfortunately there is no “right” astronomy equipment for everyone, and no “best” scope to start with. It all depends on what you want to do with the scope, what you can carry around, and how much you can invest in the hobby. I have seen people grinning from ear to ear playing with a six inch, beat up, borrowed Dobsonian that barely is holding together, I have seen people frustrated with $8,000 refractors, and everything in between.
The trick is finding the one that is right for you. That may include things like what the scope looks like, the color of paint on it, etc. I know that sounds insane but if you do not like your scope, you won’t use it, then what good is it really? What follows is my astronomy equipment, not a sales pitch for what you should buy. This is the equipment I use, I like, and I bought. Just because I enjoy it and get reasonable images out of it does not mean it will work worth a flip for you.
Primary Astrophotography Setup
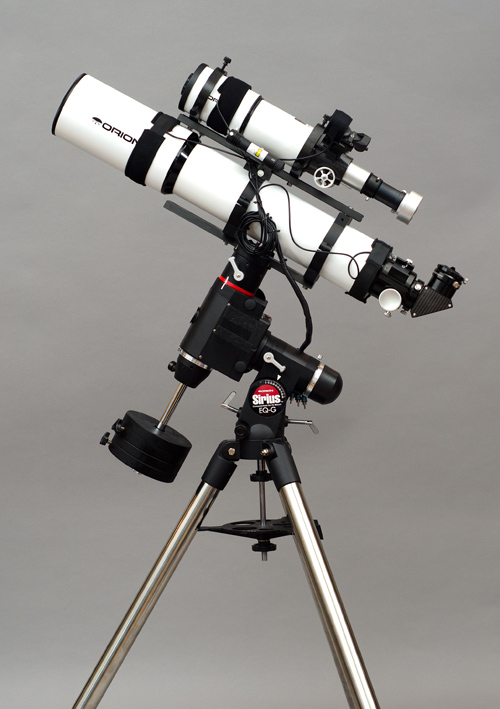 My primary telescope is the one that took most of the images you see. This piece of astronomy equipment is my pride and joy and is an Orion 110mm f7 Premium ED APO refractor with a 770mm focal length (not made any more, closest out now is probably the Sky-Watcher Pro ED 120mm Doublet APO Refractor). It sits on top of an Orion Sirius computerized EQ mount. Tracking is provided by an Orion Starshoot Auto Guider mounted in an Orion ShortTube 80mm refractor which is mounted on top of the 110mm refractor. I have two finders, an actual green laser from Celestron and an Orion/Astromania EZ Finder Deluxe.
I have a dovetail plate that attaches to the secondary dovetail on top at a right angle to support a camera for tracked widefield shots which can be taken at the same time the scope is imaging. I can also mount a DSLR or other camera upside down under the main scope tube in front of the mount.
Most people will tell you if you want to buy a scope and start in the hobby that you should buy something like a Dobsonian and do visual astronomy for a year or so before jumping into astrophotography and spending a ton of cash on expensive astronomy equipment, that is exactly what I did not do 🙂
Primary visual astronomy equipment
 When I want to do some visual while I am imaging I need a second scope that will give me some nice views and that is when I pull out the Explore Scientific AR127. Large enough to collect some light, small enough to be easily transportable. Here it is sitting on my Orion SkyView Pro mount that I use for both visual and as a second astrophotography mount for lighter loads.
The mount uses the same controller as my Sirius mount and so it will work with all the same cables, adapters, laptop and software. I find it is really nice when all my astronomy equipment works no matter what task I want to do that evening. While the mount is not really “rated” for this load for AP, it absolutely will do it, and with style.
Looking close at the scope you may notice that it does not have the typical Explore Scientific AR127 finder scope. I replaced that with my favorite red dot finder from Orion. That makes this scope tremendously easier and faster to sight. This helps make the point that the best astronomy equipment is the astronomy equipment that works the way you want it to work.
Of course I have a full set of dew straps and controller to make sure I can view all through the night, all this astronomy equipment would be useless if it was covered with dew.
Quick grab and go telescope for visual
 Sometimes I want to grab something quick and light for visual astronomy, not haul out a lot of heavy and complex astronomy equipment, and that is when this one comes out to play. This is an Orion 90mm F11 SkyView refractor on a Orion SkyView Deluxe EQ mount that I have restored from the graveyard. It is completely factory except for the mounting plate which I had custom made by a local machine shop since the old one arrived to me in four pieces. The modern version of this scope is the Orion 9024 AstroView 90mm Equatorial Refractor.
Again, astronomy equipment made 20, 30, or 40 years ago can still bring a lot of enjoyment.
Dobsonian
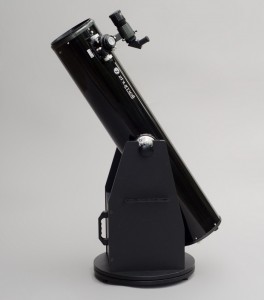 Dobs are not my first, or second choice in astronomy equipment when I head out to the field. That doesn’t mean they don’t have a place in my arsenal. This guy is the one I grab for outreach when other people are going to be putting their hands on my equipment. It is fast and easy to set up and take down, and if something happens it is inexpensive so I don’t wind up killing someone.
The Zhumell Z8 Dobsonian is an 8″ model which allows it to catch plenty of light. Optics are in my opinion above average for this size. This combination allows me to put up more than acceptable images for anyone who may show up at an outreach event wanting to learn about astronomy equipment. Orion seems to have bought out Zhumell (or at least acquired the rights) and while you can no longer get the Zhumell, you can get an Orion SkyQuest XT8 Plus Dobsonian Reflector Telescope which is almost identical and a beautiful blue color.
There is a full review of this guy here.
First Telescope
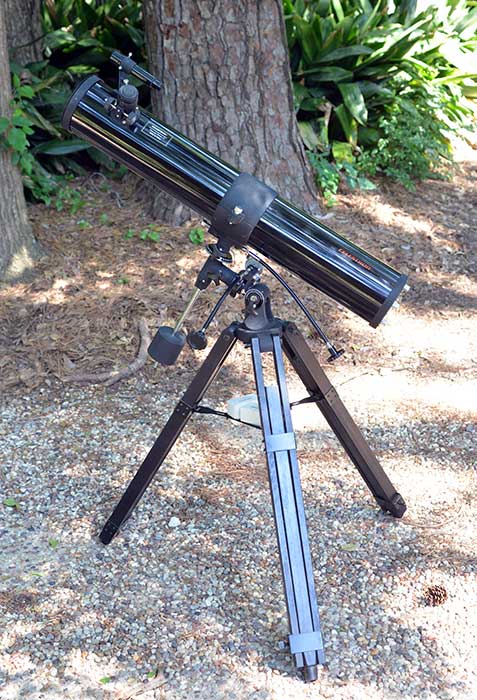
My first ever piece of astronomy equipment was purchased back around the mid 1990s and is a Celestron 114mm f9 Newtonian First Scope with a focal length of 1000mm on a very cheap EQ mount. Yup, that is the one in the image above, I still have it.
These are now called the Celestron 21045 114mm Equatorial PowerSeeker EQ Telescope and come on a metal tripod instead of the old wooden ones (I like the wood better but the metal won’t rot and requires less maintenance). They also cost about half of what my old one went for back in the day.
At the time I really hated this scope. This was back before the internet was the wealth of information it is today and learning how to use a scope on an EQ mount that wasn’t very stable was nothing short of exasperating. Finding astronomy equipment back then was not really difficult, but finding the manuals for any of it was almost impossible.
I may have drug this scope out a grand total of three times before it became a living room decoration. Funny thing is that now I tend to like to play with my older astronomy equipment more than I did back then, even though I have far superior astronomy equipment all over my house. Go figure.
The scope has been well cared for, the mirror is still in great shape, and although it is the cheapest (it was around $350 back when I bought it with three eyepieces, that I still have) scope I have it still puts up pretty good views. For me, this is the scope that proved that if you know what you are doing, you can make inexpensive telescopes or old astronomy equipment work fairly well. Everything is not about high-end equipment.
Cameras
You may not think of a camera as astronomy equipment, but even people who do not consider themselves astrophotographers will eventually want to take a picture or two.
When you start in astrophotography you will undoubtedly be told that you should get either a dedicated AP CCD camera, or use a Canon DSLR. Me being me, whipped out my Nikon DSLR and told all the “must use Canon” fanboys to keep their silly notions. For some reason they seem to be the last people to understand that it is the photographer, not the camera, that really matters. You will hear lots of horror stories about Nikon cameras and AP, and probably some about Sony, Pentax, Minolta, etc etc. If you already have a DSLR you can use it, without modifying it, just fine.
If you are staring from nothing, you certainly can choose Canon as your astronomy equipment of choice, or you can do what I did and use a Nikon D7000 which is an excellent camera for AP. And no, it does not “eat” stars 🙂 In addition to the D7000 I primarily use, you may also see some images from my D90 which also works well but of course not quite as well as the D7000.
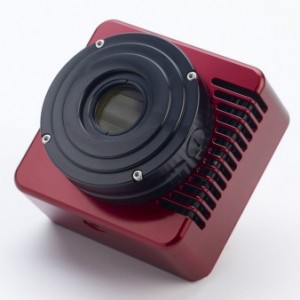
Slowing I am transitioning over to my Atik 383L+ monochrome CCD. This 8 megapixel full frame monochrome camera can deliver some outstanding images and will allow me to obtain much more detailed images. It will also make it far easier for me to shoot narrowband. This type of camera really isn’t astronomy equipment so much as it is for astrophotograhy.
More information on the Atik is available here.
Eyepieces
Since my primary focus is in astrophotography I do not use eyepieces as much as some. I do however like reasonable quality in my eyepieces just like all the rest of my astronomy equipment.
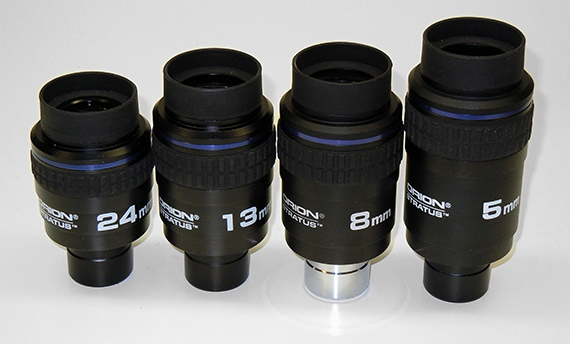
The ones I used to use for visual astronomy were the Orion Stratus eyepieces which are 2″ eyepieces that include a built in 1.25″ adapter so they can be used either way. I used these same eyepieces in both my refractors. They are far and away better than the standard Plossl eyepieces that come with many scopes and eyepiece kits. I was very pleased with my purchase of these as they provided excellent views in any astronomy equipment I put them in.
I have since upgraded to Tele Vue Nagler eyepieces and they are just simply amazing. With an 82 degree field of view and tack sharp right out to the edge, these in my opinion are the ultimate in eyepieces for generic astronomy work. There are better eyepieces for specific things, but I have never used an eyepiece that was as good as these are at being all around performers.
Yes, they are incredibly expensive, but buy them once and never have to buy eyepieces again for the rest of your life. Not too many pieces of astronomy equipment are that way so although it is a large investment, they will be with me no matter how many telescopes I go through.
Accessories
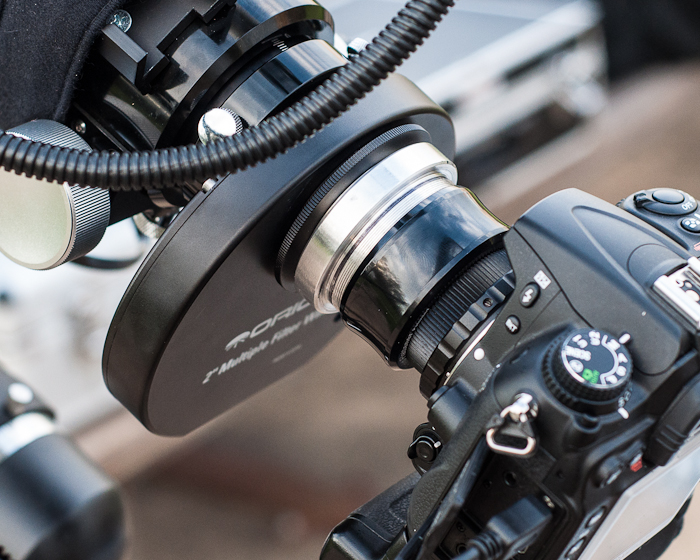
There is a ton of astronomy equipment accessories that come into play for both visual astronomy or astrophotography, but I will cover the ones I use the most. I currently use two filters, the Baader Planetarium Moon & Skyglow Filter 2″ ‘light pollution filter’ that is on virtually ever time I take a shot color. The only time this filter is not used is when I am shooting with narrowband filters (yes, sometimes with a unmodded Nikon!) including my Baader Narrowband H-Alpha (7nm) 2″ Filter. These filters screw into the nose of my HoTech SCA 2″ Field Flattener which is used to try to make the stars round all the way from the center of the image to the far corners or are installed in my Orion 5525 2-Inch Multiple 4-Filter Wheel. You may notice that older images have more problems with the stars on the edge than newer images as I did not have a field flattener.
To focus my scope I use a Bahitnov mask. It is amazing that you need this little piece of plastic to really make your expensive astronomy equipment shine, but you do. Images taken before I started using this mask have mostly been removed from the site and replaced with ones that are actually in focus 🙂 If you are into AP you absolutely, positively, without question, no excuses, need this little device, and they are cheap cheap cheap. Get one, no I mean it, right now, quit reading dummy and order one or make one right this second. Personally I bought one because it was cheap, and made out of a nice hard plastic which will not suffer from dew problems.
Speaking of dew, down here in Texas dew is a real problem. When I say that, I mean I need windshield wipers for my laptops out in the field, no really, I do! I use the Dew-Not system with the Dual Channel Controller DNC02 which is a two channel, four port controller with heater strips on both ends of my main scope, the optics end of my guide scope, and around my Orion/Astroview EZ Finder Deluxe II. Keeping dew off your astronomy equipment is incredibly important, don’t skimp out here or you will find yourself packing up and calling it a night before everyone else.
Being in Texas this one will really floor you, but from November through February you need cold weather gear. Those of you up north will undoubtedly laugh when I talk about how cold it gets outside at night, and I don’t blame you, I was laughing hysterically when I went to Washington DC and they were opening cooling centers because it was over 90 degrees while we were just fine at 110 degrees in Texas, so I get it. But anyway, when the temp drops below 50 degrees you will be amazed (or horrified) at how cold you get sitting in a chair watching your astronomy equipment for 8+ hours without moving. That lack of activity and lack of any heat source for that long will absolutely freeze you to the core. What do I wear when it gets cold? Starting from the bottom, from outside to in, insulated boots, wool socks, liner socks, up to dual-layer insulated fleece lined ski pants, sweat pants, two layers of thermal underwear, regular underwear, then up to heavy outer fleece lined jacket, fleece jacket, sweatshirt, t-shirt, thermal underwear shirt. Then don’t forget the fleece gloves, baklava and contrary to what you might think, those northerners do not wear scarves for looks, get one then remember to go completely around your neck and tuck it in completely (scarves people wear that are not tucked into jackets are just a fashion statement and pretty worthless). Then I take my oversized fold up chair and put a heating pad in the bottom (amazing how a warm rear end helps!), then place a military surplus wool blanket over the chair to form a nice little envelope for me to sit in. Lastly, I take a second wool blanket and put it over my legs.
Using wool is important because of all the dew. This setup is good to at least 30F for up to 12 hours (never gone longer). Now don’t just put all this on right as you start, you will cook. Put on a few layers and as it gets colder add more layers. Once you start to move around packing up your gear you will start to overheat so start stripping off layers (start with the outside jacket, then the scarf, you will freak out when you realize what the scarf has been doing all this time, heh).
I have also changed up the heating blanket situation. I now use a large heating pad on the bottom as before, but now I add a second heating blanket on top of me under a second wool blanket. This setup is good to 20F easily.
Software
Software as astronomy equipment? Oh yes, there is lots of software. I am currently using paper star charts in conjunction with AstroPlanner to plan out my target packages for an evening of astrophotography. This allows me to plan out the best targets at the best times on the best nights and piece it all together into a great plan. For camera control I am using ImagesPlus which gives my Nikon D7000 all its abilities right from the computer. Instant image download and viewing, check, live view right on the screen, check, focusing aids, check, all exposure settings, check. Guiding is accomplished with PHD Guiding from Stark Labs. For navigation and scope control I am using TheSkyX through EQMod. This give me a huge database of targets, the ability to align on any targets (planets, galaxies, stars, whatever), full PEC and more. Not to mention the ability to slew the scope manually using a wireless gamepad, how cool is that! Final image processing is done with a combination of PixInsight, Lightroom 4 and Photoshop CS6.
For visual astronomy I tend to use a lot of programs on my iPad and iPhone. Astronomy specific apps such as Star Walk, SkySafari, myCSC, and TriAtlas come in very handy.
Which brands of astrophotography or astronomy equipment are the best?
You may notice a large portion of my astronomy equipment is made by Orion, and that may lead you to believe I am an Orion fanboy. This is not exactly the case. I will admit I very much enjoy using their astronomy products and I have been very happy with both their presales and post sales support. I buy their equipment because I trust them to tell me what works with what, and how well it will work. Moreover I know what level of quality to expect for my money.
I have also seen some very nice astronomy equipment from Celestron, Meade, and Takahashi to name a few. Personally I feel that it is more important than brand to make sure you are not buying the cheapest astronomy equipment. Any midlevel model or better from any established manufacturer should provide you with an excellent experience.
Now I should probably clarify the term midlevel model. When I say that, I am taking a particular type of scope, for this example I will use refractors. Orion sells a cheap $80 60mm with a mount. They also sell a $2,000 102mm Triplet optical tube with no mount. Take that price range and divide it roughly into three sections, for example, $0-$699, $700-$1299 and $1300-$2000. Anything in the $700-$1299 area for the optical tube alone would make an excellent scope to last you many many years. This is a rough approximation so $600 would probably be close enough. My main scope was dead in the center. (prices taken from the Orion catalog November 2011)
Now there is astronomy equipment I do not use Orion for, again, because it is the best tool for the job. These include using Baader filters because the Orion ones have non-standard threads that do not even fit their own products, go figure. Also my HoTech field flattener because Orion does not make a field flattener that takes 2″ filters which I find amusing since they sell 2″ astrophotography filters including light pollution and narrowband.
Just remember that regardless of who makes your astronomy equipment, if it fits your needs and does a good job, it is the right tool for you.
If you have questions about my astrophotography or astronomy equipment, let me know!
Share this post!